Saturday, May 30, 2009

Gift set

I made these two projects last year but didn’t post them to my blog, so I thought I’d do that now even though most of the materials I used are discontinued.

Frappuccino bottle and candy holder

Stamp set: Wild Rose
Paper: Whisper White card stock, Blue Bayou card stock (2007-08 In Color), Porcelain Prints DSP (Spring-Summer 2008)
Ink: Bashful Blue, Blue Bayou and Wild Wasabi (2007-08 In Colors), Certainly Celery Classic ink
Accessories: Punches: Scallop edge, scallop circle, 1 3/8” circle, 1 ¼” circle, Certainly Celery ¼” grosgrain ribbon, string, assorted beads from Pretties kit, Crystal Effects, micro beads, Stampin’ Dimensionals, Sticky Strip, SNAIL adhesive, paper trimmer, scissors, frappuccino bottle, Hershey’s kisses

Stamp set: Wild Rose
Paper: Whisper White, Certainly Celery and Blue Bayou card stock (2007-08 In Color), Porcelain Prints DSP (Spring-Summer 2008)
Ink: Bashful Blue, Blue Bayou and Wild Wasabi (2007-08 In Colors), Certainly Celery Classic ink
Accessories: Scallop edge punch, Certainly Celery ¼” grosgrain ribbon, string, Crystal Effects, micro beads, Stampin’ Dimensionals, Sticky Strip, SNAIL adhesive, paper trimmer, scissors, candy bar

Please ignore the unsightly corners on this candy holder. It would have been helpful to have Mary Jo Albright’s tutorial for creating scallop squares with the scallop edge punch. I haven’t made a scallop square with her tutorial yet so I will have to give it a try soon.

I hope you’re having a good weekend. Have fun stampin’ and creatin’!

Thursday, May 28, 2009

RAK cards from friends

When I was ill in January, several friends from UDI sent me cards. I meant to share the cards with you much sooner but I didn’t have the chance to edit and post all the cards. So here they are finally:

By Adriana B- http://www.escape2stamp.blogspot.com/


From Christine R

By Janice RR- http://www.bellacosa.typepad.com/

By Jen S- http://jenstewartblog.blogspot.com/

By Micki H- http://artfulxpressions.net/

By Pat W

By Sara C- http://www.stampinchamber.com/

By Tammy F- http://www.stampwithtammy.typepad.com/

I really appreciated receiving these cards while I was sick. I told only one friend on UDI that I was sick and then suddenly, my mailbox was flooded with cards. It sure is wonderful to have friends like that!

Thank you to everyone who sent me a card. If you sent me one and don’t see it here, please let me know. I save pictures of cards to the corresponding stamp set folder, so I might have missed a card.

I should mention that some of these cards might be CASEd and some may have been made by someone other than the sender. Since I don’t know, I can’t give credit to those individuals but I can say “thank you for your inspiration” :)

Have fun stampin’ and creatin’!

Tuesday, May 26, 2009

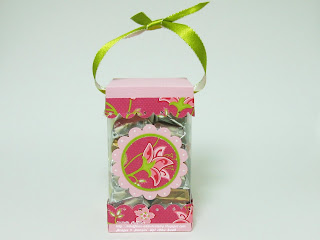
Acetate Box

I have wanted to create a clear box for awhile now, and since we now sell window sheets, I decided to give it a try. I used the acetate box tutorial on Splitcoaststampers.

Paper: Pretty in Pink, Kiwi Kiss card stock, Raspberry Tart DSP
Accessories: Punches: Scallop edge, scallop circle, 1 3/8” circle, 1 ¼” circle, 1/16” circle, Crop-A-Dile, white Uni-Ball Signo Gel pen, Kiwi Kiss/Very Vanilla satin ribbon, Stampin’ Dimensionals, SNAIL adhesive, Sticky Strip, Craft & Paper scissors, Hershey’s mini bars

This box might look familiar to you if you view my posts. I created a scallop circle card for a sketch challenge recently. You can view that post here. I made the box to match one of the cards since both the card and box were gifts for my mother-in-law.

Here I photographed the set together:

The card looks huge compared to the box in this picture but I don’t think there is such a size difference in real life. If I had positioned the box in front of the card, the proportions might look more realistic. At least you can see that the box and card coordinate :)

Thanks for stopping by today. I hope you have fun stampin’ and creatin’!

Saturday, May 23, 2009

Clear Cheep Talk Card

I didn’t have time to create a card for this week’s UDI sketch challenge, so I thought I’d post a card I recently made for a friend.

Since clear cards are popular right now, I thought I’d give it a try and make one using the medium window sheets from the Occasions mini catalog. I followed the acetate card tutorial found on Splitcoaststampers to create the following card:


Stamp set: Cheep Talk, Polka Dot background
Paper: Pacific Point, Kiwi Kiss, Rose Red, Whisper White card stock, Medium Window Sheet
Ink: Pacific Point, Kiwi Kiss, Rose Red, More Mustard, Chocolate Chip classic ink, White StazOn
Accessories: 1/8” circle punch, 5/8” Chocolate Chip grosgrain ribbon, clear rhinestone brad, glue dots, SNAIL adhesive, bone folder, paper cutter, scissors, Stampin’ Dimensional, Stamp-a-ma-jig

I used white StazOn ink to stamp the Polka Dot background on the front of the card. If the image smears, you can wipe off the extra ink with a Q-tip soaked in StazOn all-purpose cleaner.

The flower is adhered with a stampin’ dimensional to give it a 3D look, though you can’t tell from this picture.

I think the rest is self explanatory, but if you have any questions, please be sure to ask. Have a great holiday weekend, and have fun stampin’ and creatin’!

Wednesday, May 20, 2009

Cup Exchange Package

In one of the online group of stampers I belong to, we had a cup exchange program from April to May. We were assigned a partner who we had to buy a cup for. This cup could be anything, as long as it was something our partner would like. We were to fill the mug with candies and other goodies, and make a card to send along with the cup. I was very happy when I found out that my partner was Micki Harper, whom I know and have met in person a couple of times. Micki is so artistic and an inspiration to me. She has excellent taste and I knew I would adore whatever she sent me. I was right! :) Look at all of the great things she sent me:


Isn’t this a sweet package to receive? The mug is adorable and I love to use it. The only problem with it is that I always want to eat something sweet when I look at the cupcakes on the mug! And anyone who knows me knows that I don’t need a reminder to eat something sweet, especially chocolate! LOL

The mug came in a really cute gift box:


I LOVE this cowgirl card! I hinted that she could send it to me and although I wasn’t completely serious, I am so happy she took my hint :) I don’t think I could ever bear to give this card to anyone. It’s one card that I’m going to keep for myself. Sorry!


This next card is really cute and cheery. I suppose I’ll share this card with someone, after I look at it for awhile longer :)


This is an adorable die cut purse that has strawberry Creme Savers inside. Yum! I like how she stamped strawberries on the outside of the purse to match the candies inside.


Now this is a clever idea: she altered a tuna can (correct me if I’m wrong, Micki) and put delicious Bliss chocolates inside. Yes, I opened the lid so I could get the chocolates out and then carefully put the lid back on. The stamped label is a heart shaped box of chocolates with the word “chocolate”. Sorry it’s upside down, but I wanted you to see the love charm.

Micki also sent a ton of die cuts and digi images for me to color but I didn’t photograph those. I’ll share pictures once I get a chance to create something with them.

It was a real treat to receive this package. The cup exchange program was fun and easy to do, and I really enjoyed having Micki for a partner. Check out her blog here to see all of her fabulous projects.

Thanks, Micki! You made me feel pampered and special. That’s a nice feeling :)

Have fun stampin’ and creatin’!

Saturday, May 16, 2009

Sketch Challenge Week #30

I can hardly believe we are on week 30 of the sketch challenges! Since I haven’t participated in every sketch challenge, it doesn’t feel like 30 weeks to me. But I know that some Divas have participated in all 29 sketch challenges, so to them I say, “Wow, great job!”

Go to UDI to view the 30th sketch challenge.

On the following card, I used a fun and easy technique called Polished Stone. My friend Lisa over at Fountain of Inspiration showed me how to do this technique. Since this was one of my first attempts, it’s not the greatest but I think it makes an interesting background for this card.

Stamp set: Cheep Talk, Thoughts & Prayers
Paper: Handsome Hunter, Chocolate Chip, Very Vanilla card stock, Glossy paper
Ink: Handsome Hunter Classic ink, Handsome Hunter and Really Rust ink refills, Encore Gold pad and Gold refill, Black StazOn ink
Accessories: 1/16”, 1 ¼” and 1 ½” circle punches, Rubbing alcohol and cotton balls, Gold brads, Crimper, Stampin’ Dimensionals, SNAIL adhesive, Sticky Strip, paper trimmer, scissors

Go to Splitcoaststampers to view the Polished Stone technique.

If you would like to participate in the sketch challenge, post a comment and link to your blog, or upload to your Splitcoast gallery using the keyword DivaSC30. Go to UDI for more information about the challenge and to view the other Divas’ work.

Have fun stampin’ and creatin’!

Tuesday, May 12, 2009

Punch Art Class

I just realized I didn’t post the punch art we created in our February punch art class. Sorry about that! Here they are now:


We focused on using circle punches in this class, although a few other punches did sneak in ;)

Here are the individual punch art and a list of the punches used:


Pig
Punches used: 1 ¾” circle, 1 3/8” circle, ½” circle, ¼” circle, 1/8” circle, Large Star, Word Window
CASEd from Mercedes Weber in her SCS Gallery
Lion
Punches used: 1 ¼” circle, 1 3/8” circle, ½” circle, ¼” circle, 1/16” circle, Small Oval, Scallop circle
CASEd from Mercedes Weber in her SCS Gallery

Leprechaun
Punches used: 1 ¼” circle, ½” circle, ¼” circle, 5-petal flower, Scallop Circle, Key Tag, Word Window, ¼” square
CASEd from Samantha Parisi at http://rubberstampingdiva.com/?p=429


Baby Carriage
Punches used: 1 ¾” circle, ½” circle, ¼” circle, 1/8” circle
Inspired by someone on Splitcoaststampers (I apologize for not remembering your name)


Ice Cream Cone
Punch used: Scallop Circle
CASEd from Lynda at http://stampingdoc.blogspot.com/2008/10/crimper-ice-cream-cone.html


Cherries
Punch art: 1 ¾” circle, ¾” circle
CASEd from Lynda at http://stampingdoc.blogspot.com/2008/09/my-punch-zoo-book.html

We added these punch art to the book we previously created. You can view that post here.
I’ll try to post the punch art we created in last week’s class soon. Until then, have fun stampin’ and creatin’!

Saturday, May 9, 2009

Sketch Challenge Week #29

I found out that my card for this week’s sketch challenge also works for Thursday’s inspiration challenge on UDI. When I viewed the inspiration challenge, I was surprised to see that the theme was frogs, which is the theme of my card. So that works out well and I didn’t even plan it that way :)

Check out the sketch challenge for this week at UDI.

I wanted to make a card with a frog on it because I had a couple of extra punch art frogs from my last punch art class. I decided to create a get well card for a friend who is battling cancer in the hospital.

Stamp set: Inspired by Nature, Sincere Salutations
Paper: Tempting Turquoise, Chocolate Chip, Garden Green, Olive Green, Summer Sun, Pixie Pink, Whisper White card stock
Ink: Summer Sun, Garden Green, Old Olive, Pixie Pink, Only Orange classic ink
Accessories: Punches: Horizontal Slot, Boho Blossoms, 1 ¾” circle, 1 3/8” circle, ½” circle, ¼” circle, Large oval, Small oval, Stampin’ Sponge, Crimper, Stampin’ Dimensionals, SNAIL adhesive, paper trimmer, scissors

The frog is adhered on Stampin’ Dimensionals to give it a slight 3D effect. The flower is 4 layers so it stands up nicely on the card. Here’s a close up view:

I crimped the “lily pad” to give it some texture but I don’t think you can see that very well in this picture. The bulrushes are simply Chocolate Chip card stock punched from the Horizontal Slot punch.

If you would like to participate in the sketch challenge, post a comment and link to your blog, or upload to your Splitcoast gallery using the keyword DivaSC29. Go to UDI for more information about the challenge and to view the other Divas’ work.

I had fun making this card. I hope you had fun looking at it :)

Have fun stampin’ and creatin’!

Thursday, May 7, 2009

Punch Art Runner card

I wanted to make a birthday card for a nephew of mine who runs in competitions, so I created a punch art person running. Although, it might look like my person is tripping and about to fall. Oops! LOL

Paper: Night of Navy, Glorious Green, More Mustard, Blush Blossom, Basic Black, Chocolate Chip, Whisper White card stock
Ink: Brilliant Blue Stampin’ write marker, Bashful Blue Classic ink
Accessories: Punches: Word Window, Small Tag, 1 ¼” square punch, 1/8” circle, 1” circle, 2-way glue pen, SNAIL adhesive, sponge, stencil, paper cutter, paper snips

I kept the background of the card plain so the focal point would be the running person. I didn’t have a number stamp set on hand so I stenciled the number 15 with an old plastic stencil. I sponged ink on the background a bit to soften the color and to look more like the sky. For the grass, I cut a strip of Garden Green card stock and then cut short slits to create the blades of grass. I cut some of the grass blades on an angle or cut the tip of grass blade off completely and bent a few of the blades to make it look more realistic.

So there you have it, my first attempt at creating my own punch art. Hopefully I’ll improve with practice! :)

Have fun stampin’ and creatin’!

Saturday, May 2, 2009

Sketch Challenge Week #28

Check out the sketch challenge for this week at UDI.

I ended up making three cards with this sketch. Two cards for Mother’s Day and one for a friend’s birthday. The two Mother’s Day cards are identical so I’ll show you only one of them.

Stamp set: Ticker Tape Alphabet
Paper: Pretty in Pink, Kiwi Kiss card stock, Raspberry Tart DSP
Ink: VersaMark ink
Accessories: Winter White embossing powder, Big Shot die cutting machine, Scallop circle die, Circle Scissor Plus, scallop circle punch, 1 3/8” circle punch, 1 ¼” circle punch, 1/16” circle punch, white Uni-Ball Signo Gel pen, Kiwi Kiss/Very Vanilla satin ribbon, Stampin’ Dimensionals, SNAIL adhesive, Craft & Paper scissors

The birthday card is almost exactly the same except that I changed the color scheme. I like this one more than the color scheme on the card above.

Stamp set: Ticker Tape Alphabet
Paper: Regal Rose, Pretty in Pink card stock, Raspberry Tart DSP
Ink: VersaMark ink
Accessories: Winter White embossing powder, Big Shot die cutting machine, Scallop circle die, Circle Scissor Plus, scallop circle punch, 1 3/8” circle punch, 1 ¼” circle punch, 1/16” circle punch, white Uni-Ball Signo Gel pen, Whisper White taffeta ribbon, stampin’ dimensionals, SNAIL adhesive, Craft & Paper scissors

The inside of the cards look like this:

Stamp set: Eastern Blooms
Ink: Stampin’ Write Markers: Regal Rose, Old Olive
The folded circle card measures 3 ¾” from the score line tot he bottom of the circle. The Raspberry Tart circle measures 3 ½” in diameter.

These cards will fit in a Stampin’ Up! medium envelope, but to avoid bending the top scallops, you’ll want to fold the envelope flap slightly higher than the score line.

If you would like to participate in the sketch challenge, post a comment and link to your blog, or upload to your Splitcoast gallery using the keyword DivaSC28. Go to UDI for more information about the challenge and to view the other Divas’ work.

Have fun stampin’ and creatin’!