
 Supplies:
Eclipse mint tin
Paper- Designer Series Paper “Flowers For You”
3/4”square punch
3/16” corner rounder punch
Mod-Podge sealer or Sticky Strip
Foam brush
Paper plate (not shown)
Paper Cutter
Step By Step

 Step 1
Cut a piece of patterned paper 5” wide by 2-15/16” high. Wrap the paper around the tin with the seam at the back of the tin. Adhere the two seams together with temporary tape. Using a pencil, mark the paper where the hinges are.

 Step 2
Slip the paper off of the mint tin. Using the pencil marks as your guide, punch over the marks with a 3/4” square punch, punching into the paper about 2/16” deep.
 Step 3
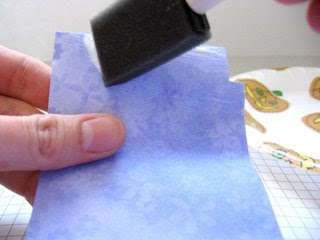
Remove the positional tape from the paper. Turn the paper over so that the wrong side of the paper is facing up and apply ModPodge to that side of the paper. Adhere the paper to the tin.
Note:
Instead of ModPodge, you can use a strong adhesive such as Sticky Strip to adhere the paper to the tin.


Step 4
Cut a piece of the same pattern paper 1-9/16” wide by 7/8” high. Use a corner rounder punch to round all four corners of the paper. Then adhere the piece to the top of the tin.

Step 5
Cut another piece of the same pattern paper 1-3/8” wide by 5/8” high. Round the corners of the paper and adhere to the lid on the inside of the tin.
Optional:
Apply ModPodge to the paper on the lid inside of the tin and on the paper on the outside of the tin to protect it.
 Step 6
Decorate and embellish as desired.
Ideas for contents of tin:
Candy
Buttons, Brads, Eyelets
Scrap pieces of ribbon
Loose change (coins)
Inspirational verses or quotes
Broken Crayons
Note paper and golf pencil


