Friday, August 28, 2009

Paper scrap organization

People have requested that I post pictures of how I organize my paper scraps, so that’s what I’ve done in this post. I apologize for the poor quality of the pictures. I don’t get much natural light in my craft room and the artificial light helps only so much.

This first picture shows how I file my card stock by color family, with the coordinating scraps above. I bought those white cubes from Michael’s. It is better to store the paper horizontally rather than vertically so that the paper doesn’t warp, but I don’t have room to store the cubes horizontally. I tend to go through my paper pretty quickly so a little warping doesn’t hurt it :) Since I don’t get much natural light in the room, my paper doesn’t fade.


Here is a close up of my scraps. The black jumbo magazine holders were bought at Wal-Mart but I haven’t been able to find them there recently. You may need to go to an office supply store to buy similar magazine holders.

The bags are zipper type bags I received for free, but Ziplock bags would work just fine. The best size is 12” x 12” or whatever you can find at the store. Keep in mind that if the bag is any wider than 12” x 12”, it won’t fit properly into the jumbo magazine holders.

I created charts in Microsoft Word for each color family and punched out the card stock using the smallest heart from the Stampin’ Up! Heart to Heart punch. I adhered each heart with a glue dot, and used double sided tape to adhere the chart to the front of the magazine holder.
I printed card stock information on regular mailing labels (1” x 2 5/8”) to identify the color and to make it easy to order more card stock.
Separating all my scraps was time consuming but it can easily be done while watching TV or talking on the phone. This filing system has saved me time searching for scraps as well time spent cleaning up after a project. It’s very simple and inexpensive to do.

I hope this post has been helpful. If you have any questions, please ask me. Have fun stampin’ and organizin’!

Tuesday, August 25, 2009

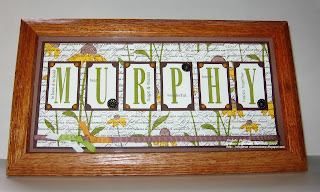
Name Frames

Over the past few months, I’ve made some projects called name frames. I first saw one made by Vicky and was in awe with her work. You can view more of Vicky’s name frames here- scroll down to the 12, 13 and 15th posts.

The following are name frames I have made:

Stamp set: Wild Rose (retired), Everyday Flexible Phrases (retired), Letterpress Alphabet (retired), En Francais
Paper: Rose Red, Always Artichoke, Whisper White card stock
Ink: Chocolate Chip, So Saffron, Barely Banana, Pretty in Pink, Regal Rose, Rose Red, Always Artichoke, Mellow Moss, Bravo Burgundy Classic ink
Accessories: Dollar store picture frame, Ticket corner punch, Silver brads, Filigree designer brads, silver embellishments from Michael’s, glue dots, Stamp-A-Ma-Jig, SNAIL adhesive, Sticky Strip, paper trimmer

Stamp set: Letterpress Alphabet (retired), En Francais, Inspired by Nature
Paper: Chocolate Chip, Close to Cocoa, Whisper White card stock
Ink: Chocolate Chip, Close to Cocoa, So Saffron, More Mustard, Old Olive Stampin’ Write markers
Accessories: Dollar store picture frame, Ticket corner punch, Earth Elements brads, embellishments from Michael’s, Chit Chat rub-ons, ¼” grosgrain ribbon in Chocolate Chip, Old Olive, Whisper White, More Mustard (retired), glue dots, Stamp-A-Ma-Jig, SNAIL adhesive, Sticky Strip, paper trimmer, scissors

Stamp set: Letterpress Alphabet (retired), A Rose is a Rose, En Francais
Paper: Rose Red, Brocade Blue, Always Artichoke, Whisper White card stock
Ink: Regal Rose, Rose Red, Pretty in Pink, Always Artichoke, Mellow Moss, Bashful Blue, Brocade Blue, Bravo Burgundy Classic ink
Accessories: Dollar store picture frame, Ticket corner punch, Rich Regals brads, gold brads, small flowers from Pretties kit, Chit Chat rub-ons, ¼” grosgrain ribbon in Chocolate Chip, Always Artichoke, Rose Red, Whisper White, glue dots, Stamp-A-Ma-Jig, SNAIL adhesive, Sticky Strip, paper trimmer, scissors

As you can see, all three projects have the same basic elements. But changing the colors and stamp sets can create an entirely different look. These can be time consuming, especially when using 2-step stamps or coloring stamps with markers, but they are fun to make and the outcome looks pretty nice :) I will defintiely be making more of these in the future.

I hope you enjoyed these projects. Have fun stampin’ and creatin’!

Saturday, August 22, 2009

Strawberry Shortcake card

Today’s card has a non-Stampin’ Up! image on it. Wow, did I just hear you gasp?! I know, I’m usually strictly Stampin’ Up! but I couldn’t resist using this image for my niece’s 5th birthday.

Please don’t look too closely at my coloring. I am the first to admit that I don’t color very well but you don’t have to agree with me out loud ;)

Stamp set: none
Paper: Pretty in Pink, Real Red, Whisper White card stock, Pink Flamingo DSP
Ink: Stampin’ Write markers
Accessories: corner rounder punch, scallop edge punch, 5/8” Regal Rose grosgrain ribbon, flat backed rhinestones (non-SU!), SNAIL adhesive, scissors, paper cutter

The Strawberry Shortcake image is actually a coloring page found on www.kids-n-fun.com, sent to me by my friend Debi. This is the direct link to the Strawberry Shortcake coloring pages on the site, though I didn’t see this particular image today when I looked.

I’m considering making a duplicate of this card for another niece’s birthday, though I’m not sure if she’s outgrown Strawberry Shortcake (she’s going to be 7). I personally still love Strawberry Shortcake and let’s just say that I am much older than my nieces :)

I hope you enjoyed this card and that you have a great weekend stampin’ and creatin’!

UDI Sketch Challenges

As Carol mentioned in today’s sketch challenge post, I am going to take a break from the sketch challenges. I love participating in these challenges but I haven’t been able to keep up with my commitment to the challenges, so I’m going to come back when I can fully participate. I hope you’ll still come visit my blog when you can.

Have fun stampin’ and creatin’!

Wednesday, August 19, 2009

Wild About You gift set

I created a baby gift set a few months ago before the “Wild About You” stamp set retired. I was sad it retired because it’s an excellent baby and children’s stamp set. As you will see below, the stamps can even be used on fabric.


T-shirt card, mini mailbox, onesie

Stamp set: Wild About You
Paper: Green Galore, Yoyo Yellow, Real Red, Ballet Blue, Bashful Blue, Whisper White card stock
Ink: Real Red Classic ink
Accessories: Punches: 1 3/8” circle, 1 ¼” circle,1/16” circle, scallop circle; Circle Scissor Plus, glue dots, 2-way glue pen, SNAIL adhesive, dimensionals, paper cutter

I created my own template for this card, though you could probably find a similar template online.


Stamp set: Wild About You
Paper: Green Galore, Brilliant Blue, Yoyo Yellow, Whisper White card stock
Ink: Green Galore, Brilliant Blue, Real Red, Only Orange, Yoyo Yellow Classic ink
Accessories: Mini mailbox, SU! wrapping paper (retired), Whisper White grosgrain ribbon, Black gingham ribbon, scissors, punches: 1 3/8” circle, 1 ¼” circle, 1/2” circle, scallop circle; sticky strip, SNAIL adhesive, dimensionals, paper cutter

I used Stampin’ Up!’s retired wrapping paper to stamp on and wrap around the mailbox. It’s thinner and more pliable than our Whisper White card stock.

Stamp set: Wild About You
Ink: Real Red, Green Galore, Ballet Blue Craft ink
Accessories: Baby onsie, cardboard, scrap paper

I stamped the elephant on this onesie about three times to get the image as bold as I wanted. I think my craft ink was drying out. Let that be a lesson to you, always keep ink refills on hand! :)

I used the masking technique to stamp my flower so it looks like the elephant is holding the flower in his trunk.

Each of these projects was easy to make, and the results are a cute and fun baby gift set.

Edited:

Some of you had questions about these projects, so I thought I would include the questions and answers in this post.

Q: Love the mini mailbox, are there instructions on how to cover one? Or did you make your own template?

A: For instructions on how to alter a mini mailbox, check out my tutorial.

Q: really cute. tell me, does the colour run when you wash the onsie?

A: After you stamp on the fabric, you heat set it. You can put it in the dryer for several minutes, or lay a cloth over the clothing and iron it to heat set it (no water needed in the iron). Do not use bleach when you wash the clothing.


I hope these answers help. If anyone has questions, please ask me.


Have fun stampin’ and creatin’!

Monday, August 17, 2009

Sketch Challenge Week #43

I’m posting Saturday’s sketch challenge on a Monday. Oops! Go over to UDI to view the sketch.

I struggled to get a good picture of this card. Some colors don’t photograph very well in my lighting. Sorry this picture isn’t very good.
Stamp set: Thoughts & Prayers
Paper: So Saffron, Whisper White card stock, Bella Bleu DSP
Ink: Chocolate Chip, So Saffron Classic ink
Accessories: Scallop border punch, ¾” and 1” circle punches, 5/8” Chocolate Chip Jumbo brads, Stamp-A-Ma-Jig, SNAIL adhesive, Sticky Strip, Crystal Effects, sponge, Big Shot machine, Texturz Plate Backgrounds 1, paper trimmer

I used the Damask Texturz plate to add texture to the Whisper White card stock. I sponged So Saffron on the textured cardstock to soften the white and to match the card base. The flowers use the fan fold technique (tutorial located here). If you are a visual learner, you will want to view the video tutorial. I believe my paper was cut at ¾” wide before I added the scallop edge for the smallest flower, and 1” wide for the largest flower.

If you would like to participate in the sketch challenge, post a comment and link to your blog, or upload to your Splitcoast gallery using the keyword DivaSC43.

Have fun stampin’ and creatin’!

Saturday, August 8, 2009

Sketch Challenge Week #42

Welcome to another Saturday sketch challenge! You can view the sketch over on UDI.

I decided to keep this card simple so I didn’t change the sketch in any way. The only embellishment I added is the ribbon. As you’ll see in the picture, I used two different colors of ribbon and tied them together. I’m not sure if I like it or not, but at least it matches the flower image on the card :)
Stamp set: Close As A Memory
Paper: Very Vanilla, Night of Navy, Kraft, Bella Bleu DSP
Ink: Night of Navy Classic ink, Night of Navy and Mellow Moss Stampin’ Write markers
Accessories: Mellow Moss and Night of Navy ¼” grosgrain ribbon, Stamp-A-Ma-Jig, SNAIL adhesive, Craft & Paper scissors, paper trimmer

If you would like to participate in the sketch challenge, post a comment and link to your blog, or upload to your Splitcoast gallery using the keyword DivaSC42.

Have fun stampin’ and creatin’!

Monday, August 3, 2009

Sketch Challenge Week #41

I’m a few days late with my card for Saturday’s sketch challenge but I figure better late than never :)

Here is the 41st UDI sketch:


And my card:

Stamp set: Cheep Talk
Paper: Whisper White, Tempting Turquoise, Green Galore, Brilliant Blue
Ink: Tempting Turquoise, Yoyo Yellow, Passion Pink
Accessories: Punches: 1 3/8” circle, 1 ¼” circle, 1” circle, Scallop Border; Big Shot, Large Dots Backgrounds 1 Texturz Plate, non-Stampin’ Up! rhinestone, Crystal Effects, SNAIL adhesive, Stampin’ dimensionals, paper trimmer

I used the Large Dots Backgrounds 1 Texturz Plate on the left side of the front of the card. I’ve noticed that the patterns from the Texturz plates don’t show up very well on camera. I like how it looks in person though :)

I changed the sketch so the piece with the circles is on the right edge of the card. As you will see in the picture below, I did this so I could punch out the circles and adhere the stamped circles to the inside of the card. I used stampin’ dimensionals to raise the images slightly so they stand out when the card is closed.
Stamp set: Cheep Talk
Paper: Whisper White, Tempting Turquoise, Green Galore, Brilliant Blue
Ink: Tempting Turquoise, Yoyo Yellow, Passion Pink
Accessories: Punches: 1 3/8” circle, 1 ¼” circle, 1” circle, Scallop Border; Big Shot, Large Dots Backgrounds 1 Texturz Plate, non-Stampin’ Up! rhinestone, Crystal Effects, SNAIL adhesive, Stampin’ dimensionals, paper trimmer

If you would like to participate in the sketch challenge, post a comment and link to your blog, or upload to your Splitcoast gallery using the keyword DivaSC41.

Have fun stampin’ and creatin’!