Today is the last day to get 20% off all Stampin’ Up! rub-ons when you spend $20. Rub-ons make quick accents for a variety of projects and are perfect to add to your Christmas cards and ornaments.
For only $8.76 per package (regularly $10.95), you can get any of Stampin’ Up!’s fun and unique Rub-Ons that can be used on cards, scrapbook pages, crafting projects, and more! This promotion includes all Rub-Ons featured in the Fall-Winter 2008 Idea Book & Catalog, the Holiday 2008 Mini Catalog and Celebrando Creatividad catalog.
111416 178 Chateau Bella
111417 178 Word Flurries
111414 178 Hidden Garden
111277 178 A Perfect Day
110283 179 Take Note
111806 179 Chills & Thrills
111804 179 Chit Chat
111415 179 Greatest Moments
111805 179 School Days
110282 179 Anchored
112844 11* Old Saint Nick
112843 17* Season of Cheer
112735 39** Hidden Garden Blossoms
*From Holiday 2008 mini catalog
**From Celebrando Creatividad catalog.
Offer good through November 30. Contact me to place your order or follow this link to order through my Stampin' Up! web site.
Have fun stampin' and creatin'!
Sincerely,
Michelle
Sunday, November 30, 2008
Treat bags with topper
I recently created 20+ treat bags for UDI. Even though the design is simple, they are surprisingly time-consuming. But they’re fun to make, especially as I know the children will love them. Actually, I should say that they will love the candy inside of them! ;)
Created by Michelle Hoffman
Stamp sets: Schoolbook Serif alphabet, Ticker Tape alphabet
Paper: Real Red, Brilliant Blue, YoYo Yellow, Green Galore, Whisper White card stock
Ink: Real Red, YoYo Yellow, Green Galore, Basic Black classic ink
Accessories:, Large cello bag, small and large star punch, Brads- Bold Brights, 1/16” circle punch, Gingham ribbon- Black, SNAIL adhesive, sticky strip, scissors, paper cutter, assorted candy.
I CASEd these from a bag topper I created in May. Since I forgot to post it, I will try to post it soon, hopefully this week.
Enjoy the rest of your weekend, and have fun stampin’ and creatin’!
Sincerely,
Michelle
Labels:
3D projects,
bags,
children
Saturday, November 29, 2008
Technique Class Projects
A few months ago, I taught a technique class where we made a postcard with the technique instructions printed on it and a sample card.
This first technique is the serigraph technique. The instructions on the card on the left say:
Choose 3-4 coordinating colors of classic ink pads. Use a brayer to partially cover white cardstock with the lightest color. Repeat with the second color, leaving some white showing. Emboss stamped images in white. Bray with the final, darkest color(s), filling in remaining white areas. Stamp more images using the darker colors of ink.
You can also click here to see the tutorial on Splitcoaststampers.
Stamp set: Dreams Du Jour
Paper: Lovely Lilac and Whisper White card stock
Ink: Yoyo Yellow, Green Galore, Ballet Blue, Lavender Lace classic ink
Accessories: Brayer, Whisper White grosgrain ribbon, SNAIL adhesive, scissors, paper cutter, printer & ink.
The second technique is ghosting, also called versamark resist. The instructions on the card on the left say:
Stamp images with Versamark ink. Dry. Ink brayer with a single color of classic ink, or a spectrum pad. Roll brayer over the cardstock. You can follow up by stamping with another color or by embossing.
You can also click here to see the tutorial on Splitcoaststampers.
Stamp set: Doodle This, Sincere Salutations
Paper: Old Olive, Ruby Red, and Cameo Coral card stock, Glossy white card stock
Ink: Ruby Red, Old Olive, Basic Black classic ink, Versamark ink
Accessories: Brayer, Whisper White grosgrain ribbon, SNAIL adhesive, dimensionals, ¾” circle punch (for leaves), scissors, paper cutter, printer & ink.
These are just a couple of techniques you can do with a brayer. If you try these techniques, or any other using a brayer, please link to your project in the comments section so I can see your work :)
Have fun stampin’ and creatin’!
Sincerely,
Michelle
Labels:
Doodle This,
Dreams du Jour,
Stamp Class projects,
Techniques
Friday, November 28, 2008
Sketch Challenge
We aren’t doing a sketch challenge for the UDI blog today, but I do have a card to share with you that I made from a sketch a few months ago.
Stamp set: Hugs & Wishes
Paper: Brilliant Blue, Yoyo Yellow, Green Galore, Real Red card stock
Ink: Basic Black classic ink
Accessories: ¼”, ½”, ¾”, 1”, 1 ¼”, 1 ½” circle punches, 2-way glue pen, SNAIL adhesive, Stamp-a-ma-jig, scissors, paper cutter.
I had the idea in my head for months to create a card with rings but I hadn’t had time to make it, so as soon as I saw the sketch, I knew how I was going to make my card. The original sketch had solid circles and was in the April 2008 issue of Stampin’ Success, a magazine for demonstrators. I’m not sure if I can post the sketch on my blog since it was in a demonstrator only magazine, so unfortunately, you won’t be able to see the sketch unless you are a demonstrator and can look at the April 2008 issue. Sorry to my non-demonstrator readers!
I will be back next week with another UDI sketch challenge, so be sure to visit my blog! :)
Have fun stampin’ and creatin’!
Sincerely,
Michelle
Labels:
Cards,
Hugs and Wishes,
Sketch Challenge
Thanksgiving Table Settings
I hope you all had a wonderful Thanksgiving! Ours was quiet, but nice.
In the past month, I have seen many pictures of table settings and I decided to create one myself. It’s a very simple one but hopefully tasteful in style.
I was inspired by the table setting Stampin’ Up! CEO Shelli Gardner shared here and by the various settings the Papertrey Design Team created here.
Here are close ups of the two stamped projects in the table setting:
Stamp set: Thankful Thoughts
Paper: Old Olive, Whisper White, Autumn Vine DSP, watercolor paper
Ink: Chocolate Chip, Close to Cocoa, Creamy Caramel, Old Olive, More Mustard, Summer Sun, Pumpkin Pie, Really Rust, Ruby Red, Night of Navy Classic Ink, Black StazOn ink
Accessories: Blender pen, 1/16” circle punch, 1 ¾”circle punch, 2” circle punch, corner rounder punch, Earth Elements brads- Old Olive-2, (non-SU!), SNAIL adhesive, sticky strip, 3 Hershey chocolate Kisses, printed name.
That’s the last of the Autumn/Thanksgiving projects for this year. Even though it isn’t officially winter yet, the holiday season begins pretty much the day after Thanksgiving in the U.S. Growing up in Canada, we started the holiday season on December 1 since our Thanksgiving is in October. So... you will have to come back to my blog in the next few days to see when I begin the holiday season! ;)
Have fun stampin’ and creatin’!
Sincerely,
Michelle
In the past month, I have seen many pictures of table settings and I decided to create one myself. It’s a very simple one but hopefully tasteful in style.
I was inspired by the table setting Stampin’ Up! CEO Shelli Gardner shared here and by the various settings the Papertrey Design Team created here.
Here are close ups of the two stamped projects in the table setting:
Stamp set: Thankful Thoughts
Paper: Old Olive, Whisper White, Autumn Vine DSP, watercolor paper
Ink: Chocolate Chip, Close to Cocoa, Creamy Caramel, Old Olive, More Mustard, Summer Sun, Pumpkin Pie, Really Rust, Ruby Red, Night of Navy Classic Ink, Black StazOn ink
Accessories: Blender pen, 1/16” circle punch, 1 ¾”circle punch, 2” circle punch, corner rounder punch, Earth Elements brads- Old Olive-2, (non-SU!), SNAIL adhesive, sticky strip, 3 Hershey chocolate Kisses, printed name.
Stamp set: Thankful Thoughts
Paper: Old Olive, More Mustard, Very Vanilla
Ink: Old Olive, More Mustard, Close to Cocoa, Chocolate Chip Classic Ink, Black StazOn ink
Accessories: Blender pen, scallop circle punch, 1 3/8” circle punch, 5/8” Chocolate Chip grosgrain ribbon, scissors, mini glue dots, SNAIL adhesive, sticky strip, 3 Hershey chocolate Kisses.
I used this pillow box for a recent stamp class. You can view details and samples of the other class projects in this post.
That’s the last of the Autumn/Thanksgiving projects for this year. Even though it isn’t officially winter yet, the holiday season begins pretty much the day after Thanksgiving in the U.S. Growing up in Canada, we started the holiday season on December 1 since our Thanksgiving is in October. So... you will have to come back to my blog in the next few days to see when I begin the holiday season! ;)
Have fun stampin’ and creatin’!
Sincerely,
Michelle
Labels:
3D projects,
Cards,
die cut,
Happy Blessings
Wednesday, November 26, 2008
Featured Stamper of the Week
This week’s featured stamper of the week is another Minnesota demonstrator, Janet Y, who is Christine P’s direct upline. A direct upline is the demonstrator you sign up with. I met Janet through UDI, an on-line group of Stampin’ Up! demonstrators. She has been very kind in inviting me to several of her events. Since my upline and her group lives out of state, I usually don’t get to join in demonstrator events, so I am very grateful to Janet for her kindness. She doesn’t receive any benefits for including me in her events; she simply does it out of the goodness of her heart.
Along with being generous, Janet is a great card maker/scrapbooker/papercrafter. Here are just a few of her many beautiful projects:
These are a few pages from Janet’s “A Year in the Life” 6 x 6 scrapbook class. Each month is a 2-page layout with an area for journaling and for 1 photo. You create the entire scrapbook in one class.
Check out Janet’s SU! Web site at www.stampwithjanety.stampinup.net
I hope you enjoyed viewing these projects as much as I liked featuring Janet!
Janet, my heartfelt thanks to you for your kindness towards me, and for sharing your creativity with us today.
Have fun stampin’ and creatin’!
Check out Janet’s SU! Web site at www.stampwithjanety.stampinup.net
I hope you enjoyed viewing these projects as much as I liked featuring Janet!
Janet, my heartfelt thanks to you for your kindness towards me, and for sharing your creativity with us today.
Have fun stampin’ and creatin’!
Sincerely,
Michelle
Labels:
Cards,
featured stamper,
Guest Artists
Holiday Extravaganza Sale
Stampin’ Up! is having an extravaganza sale! You can buy bundled products up to 50% off. You definitely do not want to miss this sale. Click here to view the details. Quantities are limited. This sale runs from November 26 to December 1. You can order online any time on my web site here or contact me.
Have fun stampin' and creatin'!
Sincerely,
Michelle
Have fun stampin' and creatin'!
Sincerely,
Michelle
Labels:
Promotions,
Sale
Tuesday, November 25, 2008
Birthday RAKs
I received quite a few handmade birthday cards for my birthday last month. I am going to share them here so you can enjoy them too.
By Alicia TW- http://papercraftplayground.blogspot.com
By Brenda T- http://memoriesbybrenda.com
By Evelyn H- featured stamper
Inside above card- Surprise Pop-Up
By Janice RR- http://www.bellacosa.typepad.com
By Lindsey G- featured stamper
By Lisa G- http://www.lisargood.com
By Lori W
By Marilee L- designed by WI demonstrator
By Tammy F- http://www.stampwithtammy.typepad.com
Aren’t all these cards beautiful? I have many talented friends and family members! My most sincere thanks to each and every one of you for thinking of me and taking the time to send me a card. You are all very much appreciated!
Have fun stampin' and creatin' everyone!
Aren’t all these cards beautiful? I have many talented friends and family members! My most sincere thanks to each and every one of you for thinking of me and taking the time to send me a card. You are all very much appreciated!
Have fun stampin' and creatin' everyone!
Labels:
Cards,
Guest Artists,
RAK
Monday, November 24, 2008
Punch Art and book
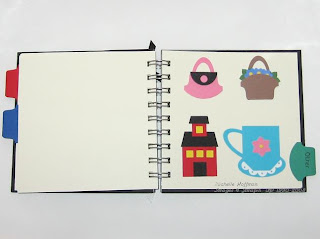
Back in September and October, we had punch art classes. In the first one, we decorated a 5” x 5” art journal and created a few Autumn/Thanksgiving punch art. In the second class, we added 10 more punch art to the book. We will continue to have punch art classes until we’ve made all the punch art we want to :)
Book with three tabbed categories: Seasonal, Animals, and Other.
Stamp set: Ticker Tape Alphabet
Paper: Basic Black, Whisper White, Real Red, Brilliant Blue, Glorious Green CS, Summer Picnic DSP
Ink: Real Red, Brilliant Blue, Glorious Green, Yoyo Yellow, Only Orange Classic Ink, Basic Black Stampin’ Write marker
Accessories: 5” x 5” art journal, spiral punch, Real Red, Whisper White and Basic Black grosgrain ribbons, sticky strip, SNAIL, scissors, paper trimmer
Seasonal: Circle punch pumpkins, Oval punch pumpkins, Circle and Oval punch turkey, Scallop and Circle punch turkey.
Seasonal: Designer Label punch Rudolph, Scallop and Circle punch Santa, Scallop punch wreath, Oval punch Christmas tree
Animals: Circle punch turtle
Other: Tab punch purse, Tab punch basket, Square punch schoolhouse, Tag punch tea cup
Other: Word Window punch candles
I got the idea for the class and book from Emiko. You can view her Punchabilities here.
Most of the punch work was inspired by memory_lane at Splitcoaststampers.
I hope this project has inspired you. If you want to join our class, whether in person or through the mail, please contact me to make arrangements.
Have fun stampin’ and creatin’!
Labels:
3D projects,
alterables,
Punch Art,
Stamp Class projects
Sunday, November 23, 2008
Stamp Class projects
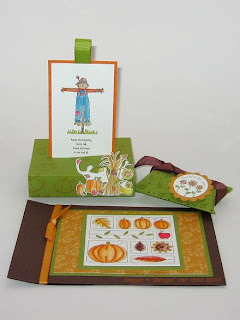
This past week, I hosted our monthly basic stamp class. We created these three Autumn/Thanksgiving themed projects:
From left to right: Free Standing Pop-Up card, Die cut pillow box, Paper Photo Album
Stamp set: Happy Blessings
Paper: Old Olive, Pumpkin Pie, Very Vanilla
Ink: Chocolate Chip, Close to Cocoa, Creamy Caramel, Old Olive, More Mustard, Summer Sun, Pumpkin Pie, Really Rust, Ruby Red, Night of Navy Classic Ink, Black StazOn ink
Accessories: Blender pen, 5/8” Old Olive grosgrain ribbon, SNAIL adhesive, sticky strip, scissors, paper cutter, Stamp-a-ma-jig.
You can view the Free Standing Pop-Up card tutorial by Mary Jo Albright on Splitcoaststampers. I almost completely CASEd (Copy And Share Everything) this from my friend Alicia, who CASEd it from someone in her SU! family. I think the only thing I changed was the color combination and I added the loop of ribbon at the top.
You can slide the tag down so it lays flat and fits perfectly inside of a medium SU! envelope.
Stamp set: Thankful Thoughts
Paper: Chocolate Chip, Old Olive, Autumn Vine DSP, watercolor paper
Ink: Chocolate Chip, Close to Cocoa, Creamy Caramel, Old Olive, More Mustard, Summer Sun, Pumpkin Pie, Ruby Red Classic Ink, Black StazOn ink
Accessories: Blender pen, Pumpkin Pie grosgrain ribbon, SNAIL adhesive, sticky strip, scissors, paper cutter, 4 medium translucent envelopes.
I first learned how to make a paper photo album almost two years ago by Alicia at a stamping retreat in Kansas City, MO. I needed a refresher on how to make it so I watched the video created by Dawn over at Dawn's Stampin' Studio.
Stamp set: Thankful Thoughts
Paper: Old Olive, More Mustard, Very Vanilla
Ink: Old Olive, More Mustard, Close to Cocoa, Chocolate Chip Classic Ink, Black StazOn ink
Accessories: Blender pen, scallop circle punch, 1 3/8” circle punch, 5/8” Chocolate Chip grosgrain ribbon, scissors, mini glue dots, SNAIL adhesive, sticky strip, 3 Hershey chocolate Kisses.
A big thanks to Alicia for cutting the pillow boxes for me on her Big Shot machine. I can’t wait until I get the Big Shot and can die cut things for other people! :)
Did you notice a trend with these projects? Aside from the Autumn/Thanksgiving theme, I mean :) My friend Alicia helped me in some capacity for each of these projects. I don’t think she knew that, but she will once she reads this post! ;) Thanks for all of your help, Alicia. You are the best!
To view Alicia’s blog, go to http://papercraftplayground.blogspot.com.
Have fun stampin’ and creatin’!
Saturday, November 22, 2008
Choose a stamp set for free
Host a $350 workshop and choose one stamp set from the Fall-Winter Sampler for free!
111564 Flight of the Butterfly $31.95
112911 Vuelo de la mariposa (Spanish Flight of the Butterfly) $31.95
111676 Puns from the Past $27.95
111660 Just Jawing $25.95
111624 Dreams du Jour $18.95
111700 Thank You Kindly $13.95
111714 Wow Flowers $12.95
112955 Flores llamativas (Spanish Wow Flowers) $12.95
111600 Bella's Bloom $12.95
Offer good through November 30. Contact me to place your order or follow this link to order through my Stampin' Up! web site.
Have fun stampin' and creatin'!
Labels:
Promotions
Friday, November 21, 2008
Sketch Challenge Week 8
This is week 8 of the UDI sketch challenges. I was unable to participate last week but I’m back this week and ready for another challenge! Here is the sketch:
Here is the card I made:
Stamp set: Simply Said, Polka Dot background
Paper: Riding Hood Red and Pink Pirouette card stock, Bella Rose DSP
Ink: Riding Hood Red, Pink Pirouette classic ink
Accessories: Horizontal slot punch, 5/8” Chocolate Chip grosgrain ribbon, Dazzling Diamonds glitter, 2-way glue pen, SNAIL adhesive, sticky strip, Stamp-a-ma-jig, scissors, paper cutter.
I created this for a friend’s teenage daughter who is going through some health issues. This is a very simple sketch so I added the ribbon to fancy it up a bit. The Chocolate Chip ribbon reflected the flash of my camera so that’s why the color and texture of it looks a bit odd. I added Dazzling Diamonds glitter to the heart for added interest.
If you would like to participate in the sketch challenge, post a comment and link to your blog, or upload to your Splitcoast gallery using the keyword divasc6. Click here for more information about the challenge and to view the other Divas’ work.
Have fun stampin’ and creatin’!
Labels:
Cards,
Simply Said,
Sketch Challenge
Thursday, November 20, 2008
Creative Living Holiday Collection Promotion
Invite the warmth and coziness of the holidays into your home with Stampin’ Up!’s® Country Living Holiday Collection Stampin’ Kit. This kit has everything you need to create beautiful handcrafted ornaments.
The Holiday Collection Stampin' Kit includes the following:
Holiday Collection stamp set (six stamps)
Four 12" x 12" sheets of die-cut chipboard
Eight 12" x 12" sheets of die-cut Designer Series paper (2 ea. of 4 double-sided designs)
Four 12" x 12" sheets of Designer Series paper (2 ea. of 2 double-sided designs)
Two 12" x 12" sheets of Whisper White card stock
25 yds. Silver Metallic cord
10 yds. 3/8" Whisper White taffeta ribbon
Pretties Kit brads (20)
Stampin' Dimensionals
Dazzling Diamonds Stampin' Glitter (1/2 oz.)
Tombow Multi Purpose Adhesive
Riding Hood Red Classic Stampin' Spot
Old Olive Craft Stampin' Spot
Uninked Stampin' Spot
Whisper White Craft Ink refill
Cost of kit is $49.95.
Subscribe to Country Living magazine at a 75% discount and get a bonus mini-stamp kit here.
This kit is available now until December 31st (or while supplies last). Contact me to place your order or follow this link to order through my Stampin' Up! web site.
Have fun stampin' and creatin'!
Labels:
Promotions
Subscribe to:
Posts (Atom)