Wednesday, February 25, 2009

Valentine's Day Stamp Class Projects

I know it is past Valentine’s Day but I thought I’d go ahead and post these projects any ways.


We made these for Valentine’s Day but they can be made for any occasion.

Stamp sets: A Little Somethin’
Paper: Whisper White, Riding Hood Red card stock, Bella Rose DSP
Ink: Riding Hood Red Classic ink
Accessories: Petal card die, Hearts set die, Full Heart punch, 1/8” circle punch, Crop-A-Dile (3/16" circle punch), Riding Hood Red 5/8" striped grosgrain ribbon, hat pin and beads from Pretties Kit, Stampin' Dimensionals, Sticky Strip, SNAIL, scissors

I used Barb M’s tutorial to create the shape of this bag. The details on the front of the heart are my own design. I stuck a beaded hat pin through the stamped heart for a “cupid” look :)


Stamp sets: Simply Said
Ink: Blazing Red StazOn ink
Accessories: Medium cellophane bag, Whisper White grosgrain ribbon, scissors, 4 chocolate Hershey Kisses and 5 chocolate Crunch hearts

I liked Barb M’s idea to use a cello bag to hold the chocolates, but I went a step further and stamped hearts all over the bag, both front and back. I used StazOn ink which dries quickly and will not smear.

I CASEd the following card which I received from my friend Alicia a year or two ago:

This card is not blurry in the original picture but the upload process made it blurry. I have no idea how to fix it so it'll have to stay that way. Sorry about that.

You can see how similar my card is to Alicia’s:

Stamp sets: Simply Said, Holidays & Wishes
Paper: Whisper White, Pink Pirouette, Riding Hood Red card stock, Bella Rose DSP
Ink: Pink Pirouette, Basic Black Classic ink
Accessories: Hearts set die, SNAIL, Stamp-a-ma-jig.

Instead of using a stamp set, I decided to use the Big Shot Hearts set dies from the Spring-Summer 2009 Idea Book & Catalog. I die cut the hearts from several patterns of the Bella Rose Designer Series Paper and adhered them randomly to the Whisper White CS strip on the front of the card. I’m not sure if you can see, but I stamped a tiny flower in Pink Pirouette Classic ink on the Pink Pirouette card front.

Thanks for looking. Have fun stampin’ and creatin’!

Saturday, February 7, 2009

Sketch Challenge Week #16

Welcome to another UDI sketch challenge! We used this fun sketch for this week’s challenge:


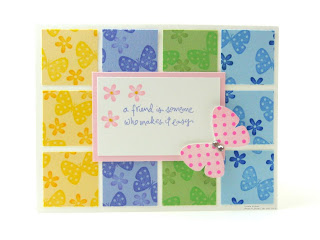
In order to get the look I had in mind, I turned the sketch on its side to create the following card:

Stamp set: Flight of the Butterfly, Simply Said (sentiment)
Paper: Barely Banana, Almost Amethyst, Certainly Celery, Bashful Blue, Pink Pirouette, Whisper White card stock
Ink: So Saffron, Yoyo Yellow, Lavender Lace, Lovely Lilac, Certainly Celery, Green Galore, Ballet Blue, Brilliant Blue, Pretty in Pink, Pixie Pink Classic Ink, Yoyo Yellow Stampin’ Write Marker
Accessories: 1 ¼” square punch, Crystal Effects, two flat rhinestones, Stampin’ dimensionals, SNAIL adhesive, paper cutter, scissors, Stamp-a-ma-jig

I used to use the Soft Subtles color family a lot but branched out to other color families, so I thought today’s sketch would be a good time revisit Soft Subtles.

You can’t really tell in the picture, but I colored in the middle of the three pink flowers on the Whisper White card stock with a Yoyo Yellow marker. I adhered the butterfly wings with dimensionals to give the butterfly “flight”. I received inspiration for adhering rhinestones to the butterfly’s body from Brenda Weaver in this post.

If you would like to participate in the sketch challenge, post a comment and link to your blog, or upload to your Splitcoast gallery using the keyword DivaSC16. Go to UDI for more information about the challenge and to view the other projects.

Have fun stampin’ and creatin’!

Saturday, January 24, 2009

Sketch Challenge #14

Welcome to another UDI sketch challenge! This is the sketch we used this week:

When I saw this sketch, I knew immediately that I wanted to use the circular “Celebrate You” stamp from the stamp set “Party Hearty”. I also wanted to try a new color combo, so I decided to use Tempting Turquoise, Chocolate Chip, Green Galore, and Yoyo Yellow. I must admit I was a bit undecided about this color combination as I lean toward more traditional colors but I think it worked out okay.

Stamp set: Party Hearty
Paper: Tempting Turquoise, Green Galore, Whisper White card stock, Bella Rose DSP
Ink: YoYo Yellow, Green Galore, Tempting Turquoise, Chocolate Chip Stampin’ Write markers
Accessories: ¾” circle punch, 1 ¾” circle punch, Circle Scissor Plus, stampin’ dimensional, SNAIL adhesive, paper cutter

I made a duplicate of the above card, but instead of adding the circle punched gift image adhered with a dimensional, I added a small clear rhinestone to the middle of the existing center image of the “Celebrate You” stamp.

Stamp set: Party Hearty
Paper: Tempting Turquoise, Green Galore, Whisper White card stock, Bella Rose DSP
Ink: YoYo Yellow, Green Galore, Tempting Turquoise, Chocolate Chip Stampin’ Write markers
Accessories: 1/8” circle punch, ¾” circle punch, 1 ¾” circle punch, Circle Scissor Plus, SNAIL adhesive, paper cutter

I think I prefer the card with the gift image, but my husband prefers the card with the rhinestone in the middle of the circle. It all depends on what your style is, I guess :)

If you would like to participate in the sketch challenge, post a comment and link to your blog, or upload to your Splitcoast gallery using the keyword DivaSC14. Click here for more information about the challenge and to view the other Divas’ work.

Have fun stampin’ and creatin’!

Saturday, January 17, 2009

Sketch Challenge Week #13

For this week’s UDI sketch challenge, I chose summer colors for my card because it’s been cold here lately and I needed some warmth :)

The sketch for this week:


My summer color inspired card:
Stamp set: Petal Pizzazz, Upsy Daisy (birthday greeting)
Paper: YoYo Yellow, Green Galore, Lovely Lilac, Whisper White card stock
Ink: YoYo Yellow, Passion Pink, Lovely Lilac, Green Galore, Tangerine Tango, Black StazOn
Accessories: SNAIL adhesive, paper cutter, stamp-a-ma-jig

I used the new stamp set “Petal Pizzazz” which is in the Spring-Summer 2009 Idea Book & Catalog, which comes out on Monday. If you’d like to purchase a catalog from me, please contact me at stampinmichelleh@aol.com.

On the Yoyo Yellow cardstock, I stamped one of the smaller flowers in Yoyo Yellow. Since it is tone on tone, it may be difficult to see in this picture. All in all, a very simple but cheerful card.

If you would like to participate in the sketch challenge, post a comment and link to your blog, or upload to your Splitcoast gallery using the keyword DivaSC13. Click here for more information about the challenge and to view the other Divas’ work.

Have fun stampin’ and creatin’!

Friday, January 16, 2009

Sketch Challenge Week #12

I am sorry it’s been awhile since I last posted to my blog. I became extremely busy with Christmas preparations and then picked up a virus on Christmas day which I am still trying to get over. I feel well enough to begin blogging again, and for my first post of the year, I’d like to post my sketch for last Saturday’s sketch challenge.

This is the sketch the challenge coordinator, Alicia chose:


This is what I created:


Stamp set: Just Buzzin’ By
Paper: Real Red, YoYo Yellow, Night of Navy, Whisper White card stock, Summer Picnic DSP
Ink: Real Red, YoYo Yellow, and Basic Black stampin’ write markers, Black StazOn
Accessories: Scallop square punch, 1 ¼” square punch, large and small oval punch, Dazzling Diamonds glitter, red gingham ribbon, SNAIL adhesive, paper cutter, paper snips.

The stamp set I used to create this card is a new one called “Just Buzzin’ By” which is in the Spring-Summer 2009 Idea Book & Catalog, which comes out on Monday. If you’d like to purchase a catalog from me, please contact me at stampinmichelleh@aol.com.

The card stock base looks almost black in this picture but it’s actually Night of Navy. I saw the idea of using the scallop squares behind the bees on Tammy’s blog here. I added glitter to the wings of each of the bees as well as glitter on the cup part of the flower. I got this idea from Brenda over at http://memoriesbybrenda.com/ in this post.

If you would like to participate in the sketch challenge, post a comment and link to your blog, or upload to your Splitcoast gallery using the keyword DivaSC12. Click here for more information about the challenge and to view the other Divas’ work.

Have fun stampin’ and creatin’!

Friday, December 12, 2008

Stamp Class Projects

We made some fun Christmas projects in our basic stamp class on Wednesday. I lent one of the projects out so I can’t take a picture of the projects grouped together. Sorry about that!

Ornament box- tutorial by Barb M
Stamp set: Greeting from Season of Joy
Paper: Real Red, Chocolate Chip, Ski Slope DSP
Ink: Chocolate Chip classic ink, Real Red jumbo cartridge
Accessories: Stampin’ Around Jumbo handle, gold cord, SNAIL adhesive, Sticky Strip, scissors, paper cutter, Stamp-a-ma-jig.

Inside- Ornament box tutorial by Barb M
Stamp set: Greeting from Season of Joy
Paper: Real Red, Chocolate Chip, Ski Slope DSP
Ink: Chocolate Chip classic ink, Real Red jumbo cartridge
Accessories: Stampin’ Around Jumbo handle, gold cord, SNAIL adhesive, Sticky Strip, scissors, paper cutter, Stamp-a-ma-jig, ornament (supply list for ornament is below)

Glitter & Reinker glass ornament- tutorial by Amy Rysavy
Ink: Real Red
Accessories: Glass ball ornament, Dazzling Diamonds glitter, rubber gloves, small container, 8” length of gold cord.

Frosty the Snowman card- video tutorial by Dawn Griffith

Stamp set: Holidays & Wishes
Paper: Whisper White, Basic Black, Pumpkin Pie, Real Red
Ink: Pretty in Pink classic ink, Whisper White Craft ink
Accessories: ½” circle punch, 1” circle punch, 1 3/8” circle punch, 1 ¼” circle punch, Trio Flower punch, dauber, White gel pen, 2-way glue pen or glue dots, Dazzling Diamonds glitter, dimensionals, Stamp-a-ma-jig.

Candy Cane Mouse Holder- video tutorial by Dawn Griffith

Stamp set: Sanded background stamp
Paper: Creamy Caramel, Pretty in Pink, Basic Black
Ink: Creamy Caramel
Accessories: White gel pen, Wide oval punch, Large oval punch, ¼” circle punch, ½” circle punch, hobby blade, small cutting mat, dimensionals, SNAIL adhesive, scissors, candy cane.

Note: I didn’t use Dawn’s template for the ears. Instead, I used the Wide Oval and Large Oval punches to create the ears.

These make pretty cute gifts and are quick to make. I plan to make the Frosty the Snowman card for all the families on my list who have children, and I will be giving a few people the ornament and box for Christmas to let them know I’m thinking of them.

This class* is available by mail for $14 (includes $5 shipping and handling). Everything will be cut and scored for you and instructions included. If you live locally, we’ll make other arrangements so you will not have to pay for S&H unless preferred.
*Please note that the glass ornament and the supplies for it will not be provided.

If you make any of these projects, I’d love to see them! Please post a link in the comments section so I may view your creations :)

Have fun stampin’ and creatin’!

Sincerely,

Michelle

Wednesday, December 10, 2008

Featured Stamper of the Week

For the featured stamper of this week, I am happy to introduce Debi N. I’ve had the blessing of meeting Debi in person and swapping ideas with her. She has a great sense of humor and is very sweet and giving. She comes up with such original and interesting ideas. She never ceases to amaze me with her creativity.

The project Debi made is an origami fold bookmark and card. The original idea came from a swap she participated in quite awhile ago. Unfortunately, the identity of the stamper is unknown so we are unable to give credit to that person. From that swap, Debi created a template for the project you see.

Read on for more information from Debi.

"This card was created with an extra gift on the corner. This is a bookmark that can be used in your Bible or other favorite book for years to come. I used papers from the Summer picnic DSP as well as the bashful blue as my main cardstock. Stamps from Tart and tangy and the Bitty Basics (level 1) were used as well as the scallop punch. I used CE on the cherries to make them shine which probably isn't visible in the pictures. Ruching the ribbon gives it a bit more texture, and then I ran it through my Xyron to make it stick easier and not loosen the edges. This ribbon is bashful blue grosgrain. The bottom scallop has red grosgrain as a knot in the center. I pierced a hole in the center of the 2 layers of paper and then made a square knot to pull it through. I distressed the edges of the papers to make it look older."

Template for Debi’s bookmark:
Bookmark folding step by step:

Completed bookmark:

Look at all the great bookmarks Debi made:


Pretty amazing, huh? I think so! :)

Debi, thank you for sharing your incredible talent with us! I hope you will be willing to be featured again sometime as I would love to show off more of your projects.
Readers, if you would like to see more of Debi’s projects, or enjoyed this post, please post a comment in the comments section.

Until later, have fun stampin’ and creatin’!

Tuesday, December 9, 2008

Gift Card Holder Class for Christmas

At last week’s basic stamp class, we made several gift card holders and one money holder card for Christmas.

Below are pictures of each card and the items used to create each project.

Money Holder Card

Stamp set: Winter Post, Heard from the Heart
Paper: Baja Breeze, Real Red, Whisper White card stock
Ink: Baja Breeze, Real Red classic ink
Accessories: Stamp-a-ma-jig, SNAIL adhesive, sticky strip, paper cutter.

I partially CASEd the money holder from Barb M. I changed the measurements to 8” x 6 ¾”, and score at 3” and 6”. I left the inside panel straight.
I CASEd the front design of this card from the front I designed on the envelope gift card holder.

Gift Card Holder- tutorial by Andrea Walford
Stamp set: Holidays & Wishes
Paper: Riding Hood Red, Whisper White card stock, Holiday Treasures DSP
Ink: Chocolate Chip classic ink
Accessories: Word Window punch, 1” circle punch, Stamp-a-ma-jig, SNAIL adhesive, sticky strip, paper cutter, Crafters’ Tool Kit, straight edge metal ruler
Gift Card Enclosure- tutorial by Dawn Olchefske.

Stamp set: Deer Friends
Paper: Old Olive, Chocolate Chip, Whisper White card stock, Holiday Treasures DSP
Ink: Real Red and Old Olive Stampin’ Write Markers
Accessories: Word Window punch, 1 ¼” circle punch, 1 3/8” circle punch, scallop punch, white gel pen, Stampin’ dimensionals, Riding Hood Red taffeta ribbon, SNAIL adhesive, sticky strip, paper cutter, scissors

Design CASEd from cornellian at Splitcoaststampers.

Gift card holder with slit tabs- tutorial by Barb M
Stamp set: Snow Swirled
Paper: Night of Navy, Whisper White card stock, Holiday Treasures DSP
Ink: Basic Black
Accessories: 1/8” circle punch, slit punch, gold cord, Stampin’ dimensionals, SNAIL adhesive, sticky strip, paper cutter, scissors, stamp-a-ma-jig, Birds & Blooms die for Big Shot die-cut machine

Envelope gift card holder- tutorial by Andrea Walford
Stamp set: Winter Post, Sincere Salutations
Paper: Baja Breeze, Real Red, Whisper White card stock
Ink: Baja Breeze, Basic Black classic ink
Accessories: Medium Whisper White envelope, Real Red grosgrain ribbon, scissors, Stamp-a-ma-jig, SNAIL adhesive, stampin’ dimensional, sticky strip, paper cutter.

These make great gifts, are quick to make and can be designed for any occasion. If you have any questions regarding the gift card holders I have posted here, please let me know.

This class is available by mail for $20 (includes $5 shipping and handling). Everything will be cut and scored for you and instructions included. If you live locally, we’ll make other arrangements so you will not have to pay for S&H unless preferred.

Have fun stampin’ and creatin’!