Showing posts with label bags. Show all posts

Tuesday, December 2, 2008

Stamped Baby Socks with bag topper

I created these bag toppers and stamped baby socks back in May for a swap. The instructions for creating both the bag topper and stamped socks are included in this post. You can't tell by this picture but I used the star stamp in Yoyo Yellow ink to randomly stamp the Yoyo Yellow CS. In person, it is visible but subtle.

Created by Michelle Hoffman
Stamp sets: By Ones & By Twos, Schoolbook Serif alphabet, Ticker Tape alphabet
Paper: Yoyo Yellow, Whisper White, Tempting Turquoise, and Green Galore CS, Transparency sheet
Ink: Real Red, Yoyo Yellow, Green Galore, Tempting Turquoise Craft ink and Classic ink, Basic Black classic.
Accessories: Baby socks- 0 to 6 months, cardboard template, Large cello bag, Small star punch, Brads- Bold Brights, 1/8” circle punch, Gingham ribbon- Red, SNAIL adhesive, double sided permanent Scotch tape, glue dots, scissors, paper cutter.

Instructions:

Baby Socks
Trace baby sock on two pieces of thin cardboard. The trace should be wider than the sock, as well as a few inches longer at the top. This will allow the sock to stretch flat on the cardboard template. Stretch the sock on to the cardboard template, with the cuff unfolded. Using craft ink, stamp as desired. Outline images are much clearer on the sock material than solid images. Let dry. Once dry, iron each sock on a covered ironing board with a dry iron. This will heat set the ink. I have also heard of people heat setting the stamped clothing by putting it in the dryer. You may want to do this if you are stamping several projects at once or have a large item to heat set.

Socks are machine washable. Do not bleach.

Cut a transparency sheet 7.5” long by 5 7/8” wide. Using a 1” piece of double sided permanent tape, tape sock to the transparency sheet. For this project, I taped the socks 3” from the top of the sheet, and 1” in from each side. Slide the transparency sheet with the socks into a large cello bag. Fold the top of the bag down, and tape in place.

Bag topper
Cut a sheet of Yoyo Yellow card stock 6”x6”. Score and fold horizontally at 3”. Use SNAIL adhesive to tape the Yoyo Yellow piece to the cello bag. Cut a piece of Whisper White card stock 5.5” long by 2.5” wide. Stamp “baby” in coordinating colors using classic ink. Stamp “socks” in Basic Black classic ink. Cut a piece of red gingham ribbon and tie around the Whisper White card stock. Then attach the Whisper White card stock to the Yoyo Yellow topper. Punch a small star using Green Galore and Tempting Turquoise card stock. Punch a hole in the center and attach a coordinating brad. Apply a glue dot to the back of each star and adhere in place on the topper.

Please let me know if you have any questions. Have fun stampin’ and creatin’!

Sincerely,
Michelle

Monday, December 1, 2008

Santa Suited Projects

Since today is the first day of December, I thought I’d post a couple of Christmas projects. I made these last year but since I didn’t post them, I figured it would be okay to post them now :)

The first one is a large pop-top Campbell soup can dressed in a Santa suit. I love decorating pop-top cans as they are so easy to do and make a great gift for anyone. For a pop-top can, you open the can at the bottom and fill it with a gift or candy, then seal it back up. The recipient then gets to open the can from the top. Click here to view the tutorial I made on altering pop-top cans.

Stamp set: none
Paper: Real Red, Basic Black, Brushed Silver CS
Ink: none
Accessories: ¾” square and 1 ¼” square punch, ¾” circle, Whisper White grosgrain ribbon, SNAIL adhesive, sticky strip, scissors, paper cutter, large pop-top soup can, can opener, Coluzzle, Crystal Effects, mixed chocolates.

I received inspiration for making the Santa suit from this sample on SCS.

Stamp set: none
Paper: Real Red, Basic Black, Brushed Silver CS
Ink: none
Accessories: ¾” square and 1 ¼” square punch, ¾” circle, Whisper White grosgrain ribbon, SNAIL adhesive, sticky strip, scissors, paper cutter, large pop-top soup can, can opener, Coluzzle, Crystal Effects, mixed chocolates.

I received inspiration for making the Santa suit from this sample on SCS.

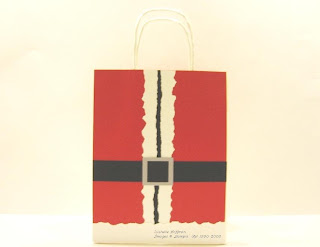
My husband made this bag. I told him what I wanted and showed him some pictures, and this is what he created. When I’m struggling with a project or need a second opinion, he’s always willing to help me and gives great suggestions. He can think outside of the box which helps me since I can’t.

(Sorry for the dingy picture. I couldn’t edit the yellow out)

I think I saw this on someone’s blog last year but unfortunately I don’t remember whose. I found a sample on SCS from last year, which I may have CASEd (but can’t remember for sure). That’s the trouble with posting a project a year late! ;)

I’ll be back with a much more recent Christmas project soon. Have fun stampin’ and creatin’!

Sincerely,
Michelle

Sunday, November 30, 2008

Treat bags with topper

I recently created 20+ treat bags for UDI. Even though the design is simple, they are surprisingly time-consuming. But they’re fun to make, especially as I know the children will love them. Actually, I should say that they will love the candy inside of them! ;)


Created by Michelle Hoffman
Stamp sets: Schoolbook Serif alphabet, Ticker Tape alphabet
Paper: Real Red, Brilliant Blue, YoYo Yellow, Green Galore, Whisper White card stock
Ink: Real Red, YoYo Yellow, Green Galore, Basic Black classic ink
Accessories:, Large cello bag, small and large star punch, Brads- Bold Brights, 1/16” circle punch, Gingham ribbon- Black, SNAIL adhesive, sticky strip, scissors, paper cutter, assorted candy.

I CASEd these from a bag topper I created in May. Since I forgot to post it, I will try to post it soon, hopefully this week.

Enjoy the rest of your weekend, and have fun stampin’ and creatin’!

Sincerely,
Michelle