Showing posts with label Christmas. Show all posts

Saturday, January 1, 2011

Christmas cards

The holiday season is officially over for another year but there are a few Christmas cards that I want to share with you any ways. 
CASEd from Sandi MacIver
Stamp set: Peaceful Season
Paper: Rich Razzleberry, Whisper White card stock
Ink: Old Olive Classic ink, Old Olive and Rich Razzleberry Stampin’ Write markers, Versamark
Accessories: Gold Embossing powder, Embossing tool, Old Olive satin ribbon, Stampin’ Dimensionals, SNAIL adhesive, Craft and Paper scissors, Paper trimmer

CASEd from Marisa Ritzen
Stamp set: Four the Holidays
Paper: Garden Green, Real Red, Baja Breeze, Whisper White, Chocolate Chip
Ink: Chocolate Chip Stampin’ Write marker
Accessories: Petals-A-Plenty embossing folder, Big Shot, Rhinestones, SNAIL adhesive, Paper snips, Paper trimmer, Ruler


CASEd from Robin Merriman
Stamp set: Tags Till Christmas, Many Merry Messages, Lovely As A Tree
Paper: Wild Wasabi, Whisper White, Cherry Cobbler
Ink: Wild Wasabi , Cherry Cobbler Classic ink
Accessories: Ornament punch, Small corner punch, retired SU! ribbon, Dazzling Diamond glitter, Rhinestones, Stampin’ Dimensionals, Glue dots, SNAIL adhesive, Paper trimmer

Stamp set: All Holidays, Dasher, Dotted background
Paper: Early Espresso, Crumb Cake, Cherry Cobbler
Ink: Cherry Cobbler, Crumb Cake Classic ink
Accessories: Scallop Circle #2, Petals-A-Plenty embossing folder, Big Shot, Circle Scissor Plus, 5/8” Early Espresso grosgrain ribbon, Dazzling Diamond glitter, SNAIL adhesive, Sticky Strip, Paper trimmer

Stamp set: Season of Joy
Paper: Garden Green, Whisper White, Real Red
Ink: Garden Green Classic ink
Accessories: Oval scallop punch, large oval punch, Bird w/Leaf die (retired), Little Leaves die, Petals-A-Plenty embossing folder, Big Shot, Stampin’ Dimensionals, SNAIL adhesive, 2-way glue pen, Paper trimmer

Wishing you and your family a blessed 2011. Don’t forget to have fun stampin’ and creatin’!


Tuesday, December 21, 2010

Christmas Stamp-A-Stack

 
CASEd from Tina White
Stamp set: Dasher, Snow Swirled
Paper: Shimmery White, Gold, and Early Espresso cardstock
Ink: Versamark
Accessories: Gold Embossing powder, Embossing tool, ¼” Early Espresso grosgrain ribbon, Stampin’ Dimensionals, SNAIL adhesive, Craft and Paper scissors, Paper trimmer


CASEd from Belinda Tubby
Stamp set: Peaceful Season
Paper: Whisper White and Marina Mist card stock
Ink: Marina Mist Classic ink
Accessories: Northern Flurry embossing folder, Big Shot, ¼” Marina Mist grosgrain ribbon, Rhinestones, SNAIL adhesive, Paper trimmer, Craft and Paper scissors

 
CASEd from Ilina Crouse
Stamp set: Greeting Card Kids, Four the Holidays, Northern Hearts
Paper: Blushing Bride, Pear Pizzazz Very Vanilla cardstock, Newsprint DSP
Ink: Blushing Bride and Crumb Cake Classic ink, Black Stazon, Pear Pizzazz, Old Olive, Crumb Cake, Daffodil Delight, Regal Rose, Blushing Bride, Riding Hood Red, Cherry Cobbler Stampin’ Write Markers
Accessories: Eyelet border punch, Spnge duabers, SNAIL adhesive, Paper trimmer

Have a safe and blessed Christmas!

Wednesday, December 15, 2010

Nugget Tins

I decorated these nugget tins to give to my club members for Christmas.  These are so easy to make!  All I did was wrap Hershey nuggets in the Candy Cane Specialty DSP from the mini catalog and decorated a band to go around the tin.  You could make this even simpler by tying a ribbon with a tag around the nugget tin, instead of using card stock and DSP like I did.

Stamp set: Tags till Christmas
Paper: Whisper White, Baja Breeze, Blush Blossom card stock, Candy Cane DSP
Ink: Garden Green Classic ink
Accessories: 1 ¼”, 1 3/8”, and scallop circle punches, 5/8” Real Red Grsograin ribbon, Clear tinsel trim, Sticky Strip, SNAIL adhesive, Glue dots, Paper trimmer, Craft & Paper scissors, nugget tin, Hershey nuggets

Hard to believe there are only 9 days left until Christmas. Have fun stampin’ and creatin’ your Christmas projects!

Tuesday, December 9, 2008

Gift Card Holder Class for Christmas

At last week’s basic stamp class, we made several gift card holders and one money holder card for Christmas.

Below are pictures of each card and the items used to create each project.

Money Holder Card

Stamp set: Winter Post, Heard from the Heart
Paper: Baja Breeze, Real Red, Whisper White card stock
Ink: Baja Breeze, Real Red classic ink
Accessories: Stamp-a-ma-jig, SNAIL adhesive, sticky strip, paper cutter.

I partially CASEd the money holder from Barb M. I changed the measurements to 8” x 6 ¾”, and score at 3” and 6”. I left the inside panel straight.
I CASEd the front design of this card from the front I designed on the envelope gift card holder.

Gift Card Holder- tutorial by Andrea Walford
Stamp set: Holidays & Wishes
Paper: Riding Hood Red, Whisper White card stock, Holiday Treasures DSP
Ink: Chocolate Chip classic ink
Accessories: Word Window punch, 1” circle punch, Stamp-a-ma-jig, SNAIL adhesive, sticky strip, paper cutter, Crafters’ Tool Kit, straight edge metal ruler
Gift Card Enclosure- tutorial by Dawn Olchefske.

Stamp set: Deer Friends
Paper: Old Olive, Chocolate Chip, Whisper White card stock, Holiday Treasures DSP
Ink: Real Red and Old Olive Stampin’ Write Markers
Accessories: Word Window punch, 1 ¼” circle punch, 1 3/8” circle punch, scallop punch, white gel pen, Stampin’ dimensionals, Riding Hood Red taffeta ribbon, SNAIL adhesive, sticky strip, paper cutter, scissors

Design CASEd from cornellian at Splitcoaststampers.

Gift card holder with slit tabs- tutorial by Barb M
Stamp set: Snow Swirled
Paper: Night of Navy, Whisper White card stock, Holiday Treasures DSP
Ink: Basic Black
Accessories: 1/8” circle punch, slit punch, gold cord, Stampin’ dimensionals, SNAIL adhesive, sticky strip, paper cutter, scissors, stamp-a-ma-jig, Birds & Blooms die for Big Shot die-cut machine

Envelope gift card holder- tutorial by Andrea Walford
Stamp set: Winter Post, Sincere Salutations
Paper: Baja Breeze, Real Red, Whisper White card stock
Ink: Baja Breeze, Basic Black classic ink
Accessories: Medium Whisper White envelope, Real Red grosgrain ribbon, scissors, Stamp-a-ma-jig, SNAIL adhesive, stampin’ dimensional, sticky strip, paper cutter.

These make great gifts, are quick to make and can be designed for any occasion. If you have any questions regarding the gift card holders I have posted here, please let me know.

This class is available by mail for $20 (includes $5 shipping and handling). Everything will be cut and scored for you and instructions included. If you live locally, we’ll make other arrangements so you will not have to pay for S&H unless preferred.

Have fun stampin’ and creatin’!


Monday, December 1, 2008

Santa Suited Projects

Since today is the first day of December, I thought I’d post a couple of Christmas projects. I made these last year but since I didn’t post them, I figured it would be okay to post them now :)

The first one is a large pop-top Campbell soup can dressed in a Santa suit. I love decorating pop-top cans as they are so easy to do and make a great gift for anyone. For a pop-top can, you open the can at the bottom and fill it with a gift or candy, then seal it back up. The recipient then gets to open the can from the top. Click here to view the tutorial I made on altering pop-top cans.

Stamp set: none
Paper: Real Red, Basic Black, Brushed Silver CS
Ink: none
Accessories: ¾” square and 1 ¼” square punch, ¾” circle, Whisper White grosgrain ribbon, SNAIL adhesive, sticky strip, scissors, paper cutter, large pop-top soup can, can opener, Coluzzle, Crystal Effects, mixed chocolates.

I received inspiration for making the Santa suit from this sample on SCS.

Stamp set: none
Paper: Real Red, Basic Black, Brushed Silver CS
Ink: none
Accessories: ¾” square and 1 ¼” square punch, ¾” circle, Whisper White grosgrain ribbon, SNAIL adhesive, sticky strip, scissors, paper cutter, large pop-top soup can, can opener, Coluzzle, Crystal Effects, mixed chocolates.

I received inspiration for making the Santa suit from this sample on SCS.

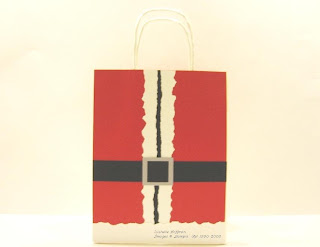
My husband made this bag. I told him what I wanted and showed him some pictures, and this is what he created. When I’m struggling with a project or need a second opinion, he’s always willing to help me and gives great suggestions. He can think outside of the box which helps me since I can’t.

(Sorry for the dingy picture. I couldn’t edit the yellow out)

I think I saw this on someone’s blog last year but unfortunately I don’t remember whose. I found a sample on SCS from last year, which I may have CASEd (but can’t remember for sure). That’s the trouble with posting a project a year late! ;)

I’ll be back with a much more recent Christmas project soon. Have fun stampin’ and creatin’!

Sincerely,
Michelle

Sunday, December 23, 2007

A Few Christmas Cards


Tag Punch Star Card- designed and made by Michelle Hoffman
Tutorial for tag punch star: http://www.splitcoaststampers.com/resources/tutorials/tag_punch_star/

Peaceful Wishes Card- designed and made by Michelle Hoffman