Showing posts with label Tutorial. Show all posts

Friday, March 21, 2008

Altered Eclipse Mint Tin

by Michelle Hoffman

Supplies:
Eclipse mint tin
Paper- Designer Series Paper “Flowers For You”
3/4”square punch
3/16” corner rounder punch
Mod-Podge sealer or Sticky Strip
Foam brush
Paper plate (not shown)
Paper Cutter

Step By Step


Step 1
Cut a piece of patterned paper 5” wide by 2-15/16” high. Wrap the paper around the tin with the seam at the back of the tin. Adhere the two seams together with temporary tape. Using a pencil, mark the paper where the hinges are.


Step 2
Slip the paper off of the mint tin. Using the pencil marks as your guide, punch over the marks with a 3/4” square punch, punching into the paper about 2/16” deep.


Step 3
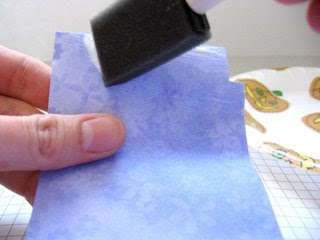
Remove the positional tape from the paper. Turn the paper over so that the wrong side of the paper is facing up and apply ModPodge to that side of the paper. Adhere the paper to the tin.

Note:
Instead of ModPodge, you can use a strong adhesive such as Sticky Strip to adhere the paper to the tin.


Step 4
Cut a piece of the same pattern paper 1-9/16” wide by 7/8” high. Use a corner rounder punch to round all four corners of the paper. Then adhere the piece to the top of the tin.


Step 5
Cut another piece of the same pattern paper 1-3/8” wide by 5/8” high. Round the corners of the paper and adhere to the lid on the inside of the tin.

Optional:
Apply ModPodge to the paper on the lid inside of the tin and on the paper on the outside of the tin to protect it.

Step 6
Decorate and embellish as desired.

Ideas for contents of tin:
Candy
Buttons, Brads, Eyelets
Scrap pieces of ribbon
Loose change (coins)
Inspirational verses or quotes
Broken Crayons

Note paper and golf pencil

Monday, February 4, 2008

Altered Mini Mailbox Tutorial

Altered Mini Mailbox
by Michelle Hoffman

Supplies:
Paper- 4” w x 12” l- Designer Series Paper “Berry Bliss”
Scissors
1/2” circle punch
3/16” corner rounder punch
Sticky Strip
SNAIL adhesive (not pictured)
Paper Cutter
Ruler
4 pieces ribbon- 12” each

Step By Step
Step 1
Cut patterned paper 4” wide by 12” long.


Step 2
On the mailbox, move the flag into the up position. Measure the distance from the center of the rivet on the flag to the rim of the front lid. The distance should be approximately 5/8”.


Step 3
Decide which way you want the design of the paper to lay on the mailbox, and then mark your paper with the measurement you just made. You can draw a line or a dot on the paper where the center of the rivet on the flag would be.

Step 4
Using the 1/2” circle punch, punch a hole on the mark you just made. Then cut a slit from the front edge of your paper to the punched circle. This will allow you to fit the paper around the rivet on the flag.

Step 5
Place a piece of sticky strip on each wide end. Place the paper on the mailbox, fitting the hole around the flag and rivet.

Step 6
Peel the red liner off one strip and attach to the bottom of the mailbox. I prefer to attach the side with the hole punched out first to assure that the hole is lined up correctly.

Step 7
Then repeat on the other side.


Step 8
Take a coordinating piece of patterned paper and trace the lid onto the paper three times. You will need two pieces for the two lids plus one piece to attach to the inside of the front lid. I simply cut inside of the lines in order to get the proper width, but you may want to measure to get it exact. The measurements of the paper for the front of the two lids should be 3” wide by 3.5” long at the highest peak. The piece for the inside of the front lid needs to be smaller than the front pieces, measuring 2-15/16” wide by 3-3/8” long at the highest peak.

Step 9
Round the bottom corners of each piece with a corner rounder punch.

Step 10
Apply adhesive to the backside of the patterned pieces and attach to the lids. If any paper overhangs the lids, trim carefully with sharp scissors.

Step 11
Take one of the 12” pieces of ribbon and apply SNAIL adhesive to one side. Attach to the mailbox. Repeat with the other three pieces of ribbon.

Step 12
Embellish as desired.

Monday, December 10, 2007

Stamping on Candles Tutorial

Stamping on Candles
By Michelle Hoffman
Supplies:
Candle- any size- for this tutorial: 6” x 2.8”
Tissue paper- 1 strip 9” long by 2 1/4” wide & 2nd strip 9” long by 1 1/4” wide
Wax paper (not shown)
Stampin’ Around jumbo wheel- So Swirly
Stamp set containing greeting- Peaceful Wishes
Stampin’ Around jumbo cartridge- Bravo Burgundy
Classic ink pad- Always Artichoke
Cellophane clear wrap- 24” x 20”
Ribbon- Satin Purely Pomegranate- 24”
String- 12”
Heating tool

Step By Step
Step 1
Remove candle from packaging. Wheel stamp across first strip of tissue paper (9” x 2 1/4”). Set aside.

Step 2
There are two ways to do step 2:

A: Using the smaller strip of tissue paper, 9” x 1 1/4”, stamp greeting at the left edge of the strip of tissue paper. Stamp the greeting again, this time 3/4” to 1/2” away from the right edge of the strip. This will allow you to place your greeting both on the front and back of the candle. By allowing a 3/4” to 1/2” space at the right edge of the strip, you will have an appropriate space between the front and back greeting when you attach the strip to the candle. Set aside.

B: Cut the 9” x 1 1/4” strip of tissue paper in half. Stamp the greeting on the two halves. Set aside.


Step 3
Look the candle over for imperfections, choosing the least marked side for the front of your candle. Wrap the strip of tissue paper with your wheeled image around the candle, placing it where you want it. The seam of the tissue paper should be on the back of your candle.

Step 4
Cut a piece of wax paper the height of your candle. Wrap the wax paper around your candle, being careful not to move the strip of tissue paper on the candle. Smooth the wax paper over the candle, gathering the ends at the back of the candle. This will be your “handle” to hold to avoid burning your hand when using the heat tool.

Step 5
Turn your heat tool on and allow it to warm up before you aim the heat at the candle. Once you feel it is sufficiently heated, aim the heat at the candle, keeping the tool straight and level. The tip of the tool should be about a 1 1/2” to 2” away from the candle. Heat the candle with a slow and even stream of heat, being sure not to concentrate the heat for too long in one place. You will be able to see your progress beneath the wax paper. The melted image will be shiny and the ink will spread out a tiny bit. If you miss any spots, you will be able to see the dull tissue paper through the wax paper. Simply go back over that spot with your heat tool, being careful not to aim the heat at the other areas already completed.

Step 6
When you need to reposition the wax paper, carefully peel it off the candle. If you have an unfinished area, such as seen above on the right side, it is best to peel the paper off starting at the melted part and working your way to the end of the tissue paper that has not yet been melted into the candle. When you reposition the wax paper, be careful not to use the part of the wax paper that has melted wax on it. Find the unused portion of the wax paper and apply that to your candle. Otherwise, the candle wax on the wax paper will get melted back on to the candle and you will get unsightly wax puddles on your image.

Step 7
When you have sufficiently melted your image on to the candle, peel the wax paper off. Repeat steps 4 to 7 to melt the greeting on to the candle. Your candle will then be completed and should look like the above picture.

Step 8
Cut the cellophane clear wrap to 24” x 20”. Lay it on your work table and stand the candle in the center of the wrap, with the front of the candle facing you. Pick up the upper left corner of the cellophane wrap and gather the diagonal corner (lower right corner) to it. Repeat with the remaining two corners.

Step 9
Tie the string tightly around the cellophane just above the top of your candle. Tie your ribbon around the string, gathering the ribbon into bunny ears to make your bow. Trim the ends of the ribbon with a “blue ribbon” edge or a diagonal cut.

*Tip:
Since the ribbon used here is wide, fold it in half and then tie it around the candle. Return the ribbon to its original width to make the bow.

Step 10
Your project is now complete!

Variations
-Place another wheeled image in place of the greeting.
-Instead of wheeling your pattern, stamp images onto the tissue paper, cut the images out and melt them into the wax.
-Use colored cellophane in place of the clear, keeping in mind the stamped images will not be visible through the colored cellophane.
-Hang beads, a charm, tag, or other embellishments from the ribbon.

Tuesday, December 4, 2007

Dyeing Fabric Flowers

Dyeing Fabric Flowers
by Michelle Hoffman


Supplies
Fabric flower from Pretties Kit
Small stamp container
Paper towels
Spray bottle
Reinkers- 1 light color with 1 contrasting color
Paintbrush or Watercolor brush
Tweezers
Step by Step
Step 1
In small stamp container, add a few drops of water or two sprays of water from a spray bottle. Add approximately five drops for medium to dark colors, and ten drops of the lighter colors.


Step 2
Swirl the reinker and water so they mix. Then add your fabric flower in to the mix.


Step 3
Using your tweezers, push the petals down into the mixture for even coverage. When you are satisfied with the shade, take the flower out of the container and lay on triple folded paper towel.
*Note: You do not need to turn your flower over as the ink will saturate both sides.

If you do not want to add shading to your flower, skip step 4 to step 6.
Step 4
Taking your contrasting reinker, add a couple of drops to the lid of the stamp container.

Step 5
Dip a fine tip paintbrush or watercolor brush in the reinker and apply it to your flower, starting from the flower center and going towards the tips of the petals.

Or for a different look, apply the contrasting color with the brush along the edges and tips of the petals.

Don’t panic at the major contrast in colors. The next step will dilute the color.

Step 6
Mist the flower with one spray from a spray bottle and use the watercolor brush to smooth out the color. This will help disperse the color evenly.

Step 7
Set the flower on paper towels to dry. The colors lighten as the fabric dries.


After the flower is dry, you can add more color to the flower if you want. Just repeat the steps mentioned above.

Additional suggestions:

Add an embellishment to the middle of your flower for a finishing touch. A brad, button or bead will work nicely. If the flower does not have a hole in the center, use a 1/16” circle punch to add the hole. Then attach your brad through the hole.

Wednesday, November 21, 2007

Pop-Top Cans
by Michelle Hoffman


Supplies:
Pop-top can (I used a 4 oz can)
Safe Cut can opener- (I used one by Chefmate found at Target)
Paper Cutter
Scissors
Coluzzle®,
other cutting system, or 1 3/4” circle punch
Crystal Effects or alternate strong liquid adhesive (to attach bottom lid to can)
Mini Glue Dots or alternative adhesive (to attach flowers to tag)
Sticky Strip (Red Liner Tape) or alternate strong adhesive
2-Way Glue Pen

Card stock- 8.5” long by 1 7/8” wide strip (here I used Regal Rose), 1 3/4” circle (here I used Certainly Celery), Whisper White for flowers
Stamp sets: Stampin’ Around jumbo wheel- Flitting By; Canvas Background; Designer Label
Inks: Stampin’ Around Jumbo ink cartridge- Pretty in Pink; Classic Stampin’ Pad- Certainly Celery
Punches: Designer Label; Spring Bouquet Flower; 1/8” circle punch
Ribbon: 2 pieces- 8.5” long each (here I used Grosgrain Light Orchid)
Assorted ribbon pieces- 4” long or less (here I used Grosgrain White, Rose, Light Orchid, Celery) Pieces of cardstock or other paper for filling the can
6 Hershey Kisses or other goodies

Optional- Pearl Ex and hair spray (to add shimmer to your project)
Optional- Fray Check (to prevent the ends of the ribbon from fraying).

Step by Step


Step 1
Using the safe cut can opener, open the bottom of the can so that you keep the top of the can intact. (It is best to use a soft or safe cut can opener because it opens the can from the side of the rim instead of the bottom of the rim to prevent jagged edges).


Step 2
Soak the can in hot water or use a cleaner such as Goo Gone to remove the label and glue. You don’t want any bumps showing from beneath your paper.


Step 3
Place the chocolates in the can first, and then fill the rest of the can with the crimped paper.


Step 4
Using a liquid adhesive such as Crystal Effects, place the glue along the lip of the rim.


Step 5
Place the lid back onto the bottom of the can and press it firmly down.


Step 6
Place a book on top of the can to firmly press the lid down as the glue hardens. I place a piece of cardboard between the can and the book to avoid imprints on my book.


Step 7
Take the card stock (here I used Regal Rose) and cut it at 1 7/8” wide by 8.5” long.


Step 8
Using “Flitting By” Stampin’ Around Jumbo wheel with jumbo cartridge (here I used Pretty in Pink), roll out the design on your strip of card stock.


Step 9 (optional)
Add 1/4 to 1/2 tsp Pearl Ex to a travel sized bottle of hairspray (here I used Flamingo Pink from Assortment 3 from Stampin’ Up!). Shake gently. Spritz on your cardstock for a shimmery look. Don’t spray too close as that creates splotches. You want a light mist on the paper. Also, since it is a spray, it will spray on items around your work area, so place old flyers or such underneath and around your project. Let the card stock dry (this takes just a few minutes).


Step 10
Once your card stock is dry, apply Sticky Strip (also known as Red Liner tape) to the back of it. You can use glue dots instead, but I have found that they tend to show a bumpy pattern. Peel the backing off of the Sticky Strip or Red Liner tape.


Note: You want the can to face you this way so that when you adhere the card stock to the can, the seam is at the back of the can, the side not facing you.


Step 11
Adhere the card stock, with the seam at the back of the can, as mentioned in the above note.

Note: You will want to overlap the CS ends slightly but not where it is too bulky. The width can be adjusted shorter to accommodate another layer of CS or made wider in place of the ribbon.


Step 12
Cut 2 pieces of ribbon 8.5” long each (here I used Light Orchid grosgrain ribbon). Attach Sticky Strip (or Red Liner tape) to both pieces of ribbon.


Step 13
Peel the backing off of the Sticky Strip (or Red Liner tape) and adhere one piece of ribbon to the bottom rim of the can, starting over the seam of the card stock. Adhere the second piece of ribbon to the top rim of the can, starting over the seam of the card stock.

Note: I adhered the ribbon over the top rim, but you can adhere the ribbon just below the top rim if you prefer that look.


Step 14
Stamp an image from Designer Label Punch kit on to matching card stock (here I used Certainly Celery card stock and Classic Stampin’ ink). Punch the image out using the Designer Label Punch.


Step 15
Place Sticky Strip (or Red Liner Tape) on the back of the label. Adhere to the front of the can, in line with the tab on top of the can.


Step 16
On Whisper White card stock, punch out two matching flowers using the Spring Bouquet Flower punch.


Step 17
On Regal Rose card stock, punch out two holes using the 1/8” circle handheld punch. Open the “mouth” or bottom of the punch by pulling down on the tab. Retrieve your two punched circles.


Step 18
Apply liquid glue to the Regal Rose 1/8” circles (here I used a 2-way glue pen)


Step 19
Apply a mini glue dot to the center of each flower on the back side, and adhere to the label on the pop top can.


Step 20
Apply ink (here I used Certainly Celery) to a small portion of the Canvas Background stamp. Stamp your image on matching card stock (here I used Certainly Celery). I find it easier to apply a solid image of a large stamp like this one if I stand up and apply pressure to the stamp while pressing it down on the paper with both hands.


Step 21
Using the Coluzzle (or other cutting system), cut out a 1 3/4” circle.


Step 22
Insert the 1 3/4” circle into the 3/4” circle punch so that the card stock is covering half of the 3/4” circle. Punch that section out.


Step 23
Turn the 1 3/4” circle over to the plain side, and adhere a strip of SNAIL adhesive to the end of the circle, opposite the notched section. This way when you place the circle on top of the can, it will not stick to the can until you are ready to adhere it in place.


Step 24
Lift up the tab very slightly to allow room for the circle to slide beneath the tab, and adhere the circle when you have it in place.


Step 25
Cut ribbon into lengths of 4” or less, or use scrap pieces of ribbon. (Here I used two of each color: Rose, Light Orchid, White, Celery grosgrain ribbon)


Step 26
Lift the tab slightly, and slide the ribbon half way under the tab. Tie the ribbon into a knot. Cut the end of the ribbon on an angle.
Note: You may want to trim the ribbon as you tie each piece so that you don't miss an end as you add more ribbon to the tab.


Step 27 (optional)
To protect the ends of the ribbon from fraying, I use a sewing product called Fray Check. It can be found in any fabric/sewing store or sewing department. I apply it to all the ribbon ends.


Step 28

Finished project (top view and front view).